How To Use Weights & Biases With MMDetection
In this article, we'll train an object detection model using MMDetection and learn how to use MMDetWandbHook to log metrics, visualize predictions, and more.
Created on June 8|Last edited on January 24
Comment
The goal of this article is simple: to use MMDetection to train an object detection model and see how Weights & Biases helps you log training and validation metrics, visualize model predictions, version raw validation dataset, and more. More specifically, we're training a Mask RCNN model on a small Balloon dataset. Before we jump in, though, let's talk a little more about MMDetection.
MMDetection is a popular open-source repository for object detection tasks based on PyTorch by OpenMMLabs. It offers composable and modular API design, which you can use to easily build custom object detection pipelines. It has over a hundred pre-trained models and offers standard datasets out-of-the-box. Plus, it supports both single-GPU and multi-GPU training. You can check out the GitHub repository here.
On the W&B side, this post will showcase a dedicated MMDetWandbHook for MMDetection that can be used to:
✅ Log training and evaluation metrics.
✅ Log versioned model checkpoints.
✅ Log versioned validation dataset with ground truth bounding boxes.
✅ Log and visualize model predictions.
Here's what we'll cover:
Table of Contents
SetupDatasetModelConfigurationHooksDedicated Weights & Biases HookTrain with Weights & BiasesSummary
Let's get going.
Setup
Here, we'll quickly set up everything required to start training using MMDetection on a custom dataset. If you'd like to follow along with executable code, that Colab link above will get you started.
Install MMDetection
MMDetection is heavily dependent on the MMCV library. If you aren't familiar, MMCV is a foundational library used by most projects (repositories) under OpenMMLabs. Note that we will have to install the correct version of MMCV that is compatible with the given PyTorch version. Both MMCV and MMDetection are pip installable. Check out the installation documentation page for more details.
Here's the code you'll need to install:
# Install PyTorch.!pip install -qq torch==1.9.0+cu111 torchvision==0.10.0+cu111 -f https://download.pytorch.org/whl/torch_stable.html# Install mmcv-full.!pip install -qq mmcv-full -f https://download.openmmlab.com/mmcv/dist/cu111/torch1.9.0/index.html# Install mmdetection!git clone https://github.com/open-mmlab/mmdetection%cd mmdetection!pip install -e .
Install Weights & Biases
You can easily install Weights & Biases using the pip package installer for Python. If you have not already created a W&B account, you can do so by visiting their signup page. You can authenticate a machine to start logging runs (metrics, data, etc.) to W&B by login in using your secret authentication token.
!pip install -q --upgrade wandbimport wandbwandb.login()
Dataset
As mentioned above, we will be using a small balloon dataset. You can download the dataset using the code snippet shown below:
!wget https://github.com/matterport/Mask_RCNN/releases/download/v2.1/balloon_dataset.zip!unzip -q balloon_dataset.zip
To support a new data format, it's recommended to convert the annotations to either the COCO format or the PASCAL VOC format. If converting annotations to COCO format, do so offline and use the CocoDataset class. If converting it to the PASCAL format, use the VOCDataset class. These classes can be assigned using the config system, which you will see below. Check out the colab notebook associated with this report to see how we are converting the format for the Balloon dataset. You can find more details about using the custom datasets here.
The MMDetWandbHook will automatically log the validation data; the number of samples can be determined using the num_eval_samples. We will dig into MMDetWandbHook soon, but here's a quick preview of the dataset. The panel below is the W&B Tables, where validation data is logged.
Run set
1
Model
MMDetection provides over a hundred pre-trained object detectors via Model Zoo. Here's that documentation page.
You can easily customize the model's backbone, neck, head, ROI, and loss and you can learn more about customizing the model here. For this tutorial, we will be using a pre-trained model checkpoint and fine-tuning it on our custom dataset. Let's download the model in the checkpoints directory:
!mkdir checkpoints!wget -c https://download.openmmlab.com/mmdetection/v2.0/mask_rcnn/mask_rcnn_r50_caffe_fpn_mstrain-poly_3x_coco/mask_rcnn_r50_caffe_fpn_mstrain-poly_3x_coco_bbox_mAP-0.408__segm_mAP-0.37_20200504_163245-42aa3d00.pth \-O checkpoints/mask_rcnn_r50_caffe_fpn_mstrain-poly_3x_coco_bbox_mAP-0.408__segm_mAP-0.37_20200504_163245-42aa3d00.pth
Configuration
MMDetection relies heavily on the config system. The configuration system stitches every component of MMDetection together. Every object detection framework, like Faster R-CNN, Mask R-CNN, Cascade R-CNN, RPN, SSD, YOLO, etc., has its own configuration files. We can load the file of choice and modify the methods as per requirement. You can learn more about the MMDetection Config system here.
Now, most config files are composed using the four basic component types under config/__base__ - dataset, model, schedule, default_runtime. You can directly modify the required method in the files or load the config file and modify it by accessing the required methods using the cfg object as shown below:
config_file = 'mmdetection/configs/mask_rcnn/mask_rcnn_r50_caffe_fpn_mstrain-poly_1x_coco.py'cfg = Config.fromfile(config_file)
Notice the use of COCODataset here:
# Define type and path to the images.cfg.dataset_type = 'COCODataset'cfg.data.test.ann_file = 'balloon/val/annotation_coco.json'cfg.data.test.img_prefix = 'balloon/val/'cfg.data.test.classes = ('balloon',)cfg.data.train.ann_file = 'balloon/train/annotation_coco.json'cfg.data.train.img_prefix = 'balloon/train/'cfg.data.train.classes = ('balloon',)cfg.data.val.ann_file = 'balloon/val/annotation_coco.json'cfg.data.val.img_prefix = 'balloon/val/'cfg.data.val.classes = ('balloon',)
Since we just have one class in our dataset (balloon, of course), we will specify the model to build the bounding box head and mask head accordingly. Also notice the use of the model checkpoint that we downloaded in the previous section:
# modify num classes of the model in box head and mask headcfg.model.roi_head.bbox_head.num_classes = 1cfg.model.roi_head.mask_head.num_classes = 1# Use the pretrained model.cfg.load_from = 'checkpoints/mask_rcnn_r50_caffe_fpn_mstrain-poly_3x_coco_bbox_mAP-0.408__segm_mAP-0.37_20200504_163245-42aa3d00.pth'
Let's now define the training configs. Notice the use of checkpoint_config.interval and evaluation.interval. They will come in handy later on!
# The original learning rate (LR) is set for 8-GPU training.# We divide it by 8 since we only use one GPU.cfg.optimizer.lr = 0.02 / 8cfg.lr_config.warmup = Nonecfg.log_config.interval = 10# Epochscfg.runner.max_epochs = 12# Set seed thus the results are more reproduciblecfg.seed = 0set_random_seed(0, deterministic=False)cfg.gpu_ids = range(1)# ⭐️ Set the checkpoint interval.cfg.checkpoint_config.interval = 4# Set up working dir to save files and logs.cfg.work_dir = './tutorial_exps'cfg.device = 'cuda'# ⭐️ Set the evaluation interval.cfg.evaluation.interval = 2
The configuration must be tracked properly for an ML experiment to be reproducible. We'll see how to log the configuration to W&B using MMDetWandbHook in the later section. But before we talk about MMDetWandbHook, let's get a TL;DR of hooks in the context of MMDetection:
Hooks
In general, hooks are functions that automatically get executed after a particular event. MMDetection offers various standard hooks which can be accessed via the default_runtime component of the config system. Some of the config methods (important for this tutorial) are listed below:
- log_config - Use this to initialize various logger hooks like TextLoggerHook, MMDetWandbHook, etc.
- checkpoint_config - Use this to initialize the MMCV's CheckpointHook. This hook saves the model checkpoints at intervals defined above in the configuration section.
- evaluation - Use this to initialize the MMCV's EvalHook or DistEvalHook, depending on the number of GPUs available. This hook evaluates the model on the validation data at intervals defined above in the configuration section.
Usually, hooks have a priority status associated with them. In this case, log_config has VERY_LOW priority while other hooks have a NORMAL priority.
Dedicated Weights & Biases Hook
MMDetection now comes with a dedicated Weights & Biases Hook called MMDetWandHook. With this dedicated hook, you can:
- log train and eval metrics along with system (CPU/GPU) metrics
- save the model checkpoints as W&B Artifacts
- visualize the validation dataset as interactive W&B Tables
- visualize the model prediction as interactive W&B Tables
Since MMDetWandbHook is a logger hook, it can be initialized using the log_config method.
Usage
cfg.log_config.hooks = [dict(type='TextLoggerHook'),dict(type='MMDetWandbHook',init_kwargs={'project': 'MMDetection-tutorial'},interval=10,log_checkpoint=True,log_checkpoint_metadata=True,num_eval_images=100)]
There are four important arguments in the MMDetWandbHook that can help you get the most out of MMDetection. Let's get into those.
Log Metrics
In order to log training and evaluation metrics along with system metrics, use the init_kwargs argument. This argument takes in a dictionary of key-value pairs which in turn is passed to wandb.init. You can use it to set the W&B project name, set the team name (entity) if you want to log the runs to a team account, pass the configuration, and more. Check out what all you can pass to wandb.init here.
Training Metrics:
Run set
1
Validation Metrics:
Run set
1
System Metrics + Miscellaneous:
Run set
1
Checkpointing
MMDetection uses MMCV's CheckpointHook to periodically save model checkpoints. The period is determined by checkpoint_config.interval. However, these checkpoints are saved locally and might get overwritten by a new experiment.
You can reliably store these checkpoints as W&B Artifacts by using the log_checkpoint=True argument. By saving them as W&B Artifacts, you can easily transfer the checkpoints across machines, keep different model ideas separately, and compare them across variants.

Figure 1: W&B Artifacts UI. The checkpoints are shown as different versions on the left-hand side pane. You can download the model from the Files tab or use API to download it programmatically.
Here are a few things worth noting:
- There are 3 versions of checkpoints in the UI as shown above. That's because the model was trained for 12 epochs with checkpoint_config.interval=4.
- Each version has an alias epoch_x where x is the current epoch.
- The last checkpoint is marked with the alias latest.
We recommend you set the checkpoint interval with caution to save both local and W&B storage space.
Checkpointing with Metadata
The checkpoints can be even more meaningful if it has some useful metadata associated with them. If log_checkpoint_metadata is True, every checkpoint version will have metadata associated with it.
The metadata is a dictionary of key-value pairs that contain the evaluation metrics computed on the validation data using that checkpoint along with the current epoch.

Figure 2: W&B Artifacts UI. The logged metadata is displayed under the Metadata tab.
Note that this feature depends on the CheckpointHook as well as EvalHook or DistEvalHook. The metadata is logged only when the checkpoint interval is divisible by evaluation interval (i.e, ckpt_interval % eval_interval == 0).
Visualize Dataset and Model Prediction
The ability to interactively visualize the dataset and especially the model prediction can help build and debug better models. MMDetection evaluates the model on the validation data periodically using EvalHook if only one GPU is available or DistEvalHook if multiple GPUs are to be used. The period is controlled by evaluation.interval (starred above).
Using MMDetWandbHook you can now log the validation data as W&B Tables and create versioned W&B Tables for model prediction. W&B Tables is a two-dimensional grid of data where each column has a single type of data - image, text, scalars, etc.
MMDetWandbHook's num_eval_images argument controls the number of validation samples that are logged as W&B Tables.
Here are a few things to note:
- If the num_eval_images=0, the validation data, as well as model predictions, will not be logged.
- If validate=False for mmdet.core.train_detector API, the validation data and model predictions will not be logged.
- If the num_eval_images is greater than the total number of validation samples, the complete validation dataset is logged.
We've already seen the validation data logged as W&B Tables above. At every evaluation interval, the predicted bounding boxes, along with the ground truth, are logged as W&B Tables. Check out the model predictions in the table shown below.
Run set
1
Quick Note on Storage
The prediction tables for each evaluation interval are logged as unique versions. Notice that the media/ directory has a storage footprint of just a few KBs. These few KBs are due to the logging of the predicted segmentation masks. Thus the validation data is logged only once as W&B Tables, and subsequent tables use reference to that data.
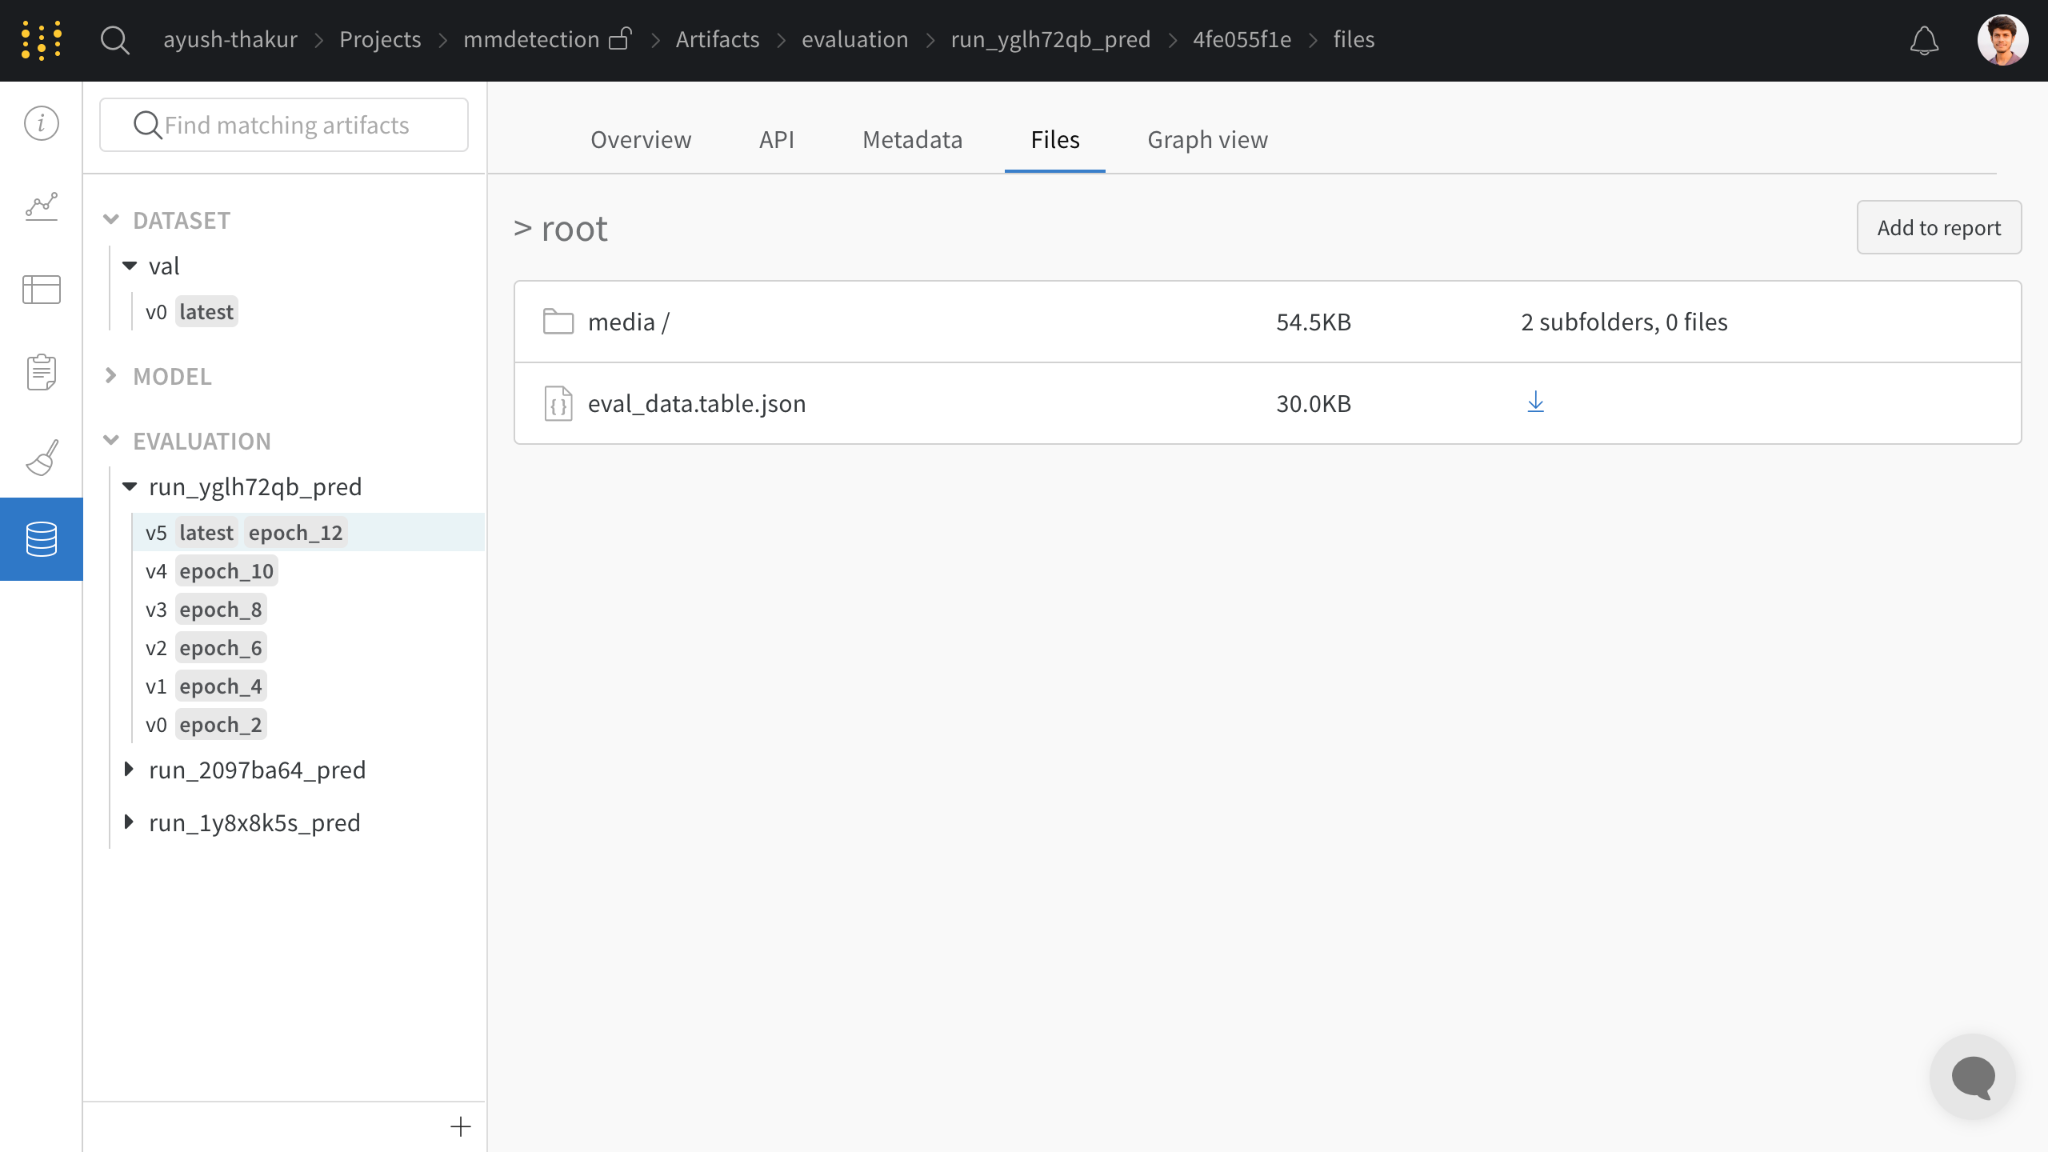
Figure 3: W&B Artifacts UI. In the Files tab you can see the memory footprint of the logged table.
Train with Weights & Biases
In this section, we will build a training pipeline using modular APIs provided by MMDetection. Like any training pipeline, we need the data loader, model, and training loop. But before we train the model, let's see how configuration can be logged.
Logging Configuration
If you use tools/train.py for training your model, the configuration is logged automatically. However, if you are using your own training pipeline, make sure to follow the steps:
- Create a dict, meta, with exp_name as the key whose value is the name of the config file.
meta = dict()meta['exp_name'] = os.path.basename(config_file)
- Dump the config in the work_dir/meta['exp_name'] dir. MMDetWandbHook will automatically read the saved config file and log it.
Train
As you can see in the code snippet below, MMDetection offers out-of-box APIs to build the required components of our training pipeline.
def train(cfg, meta):# Build datasetdatasets = [mmdet.datasets.build_dataset(cfg.data.train)]# Build the detectormodel = mmdet.models.build_detector(cfg.model, train_cfg=cfg.get('train_cfg'), test_cfg=cfg.get('test_cfg'))model.CLASSES = datasets[0].CLASSES# Dump config for loggingmmcv.mkdir_or_exist(os.path.abspath(cfg.work_dir))cfg.dump(os.patg.join(cfg.work_dir, meta['exp_name']))# Train the model.mmdet.apis.train_detector(model, datasets, cfg, distributed=False, validate=True, meta=meta)
The train_detector API can be used to train the model in a multi-GPU setting by turning distributed=True. If you don't want to evaluate the model on the validation dataset, turn validate=False. Note that if validate is False, EvalHook or DistEvalHook will not be initialized. To train, simply do the following:
train(cfg, meta)
Since we have already seen the logged metrics, data, and model predictions above, let's look at the logged config below.
Run set
1
Summary
MMDetection is a popular framework for object detection and segmentation task. Now that a dedicated MMDetWandbHook is part of this framework, you can get even more out of your workflow. As shown above, using it is as simple as updating the log_config method of the config file.
I hope this feature will add value to your workflow. If you have any questions feel free to leave a comment down below or open an issue here or here. We also have integrations with popular object detection frameworks like YOLOv5 and PaddleDetection. Check them out below:
YOLOv5 Object Detection on Windows (Step-By-Step Tutorial)
This tutorial guides you through installing and running YOLOv5 on Windows with PyTorch GPU support. Includes an easy-to-follow video and Google Colab.
Object Detection with PaddleDetection and Weights & Biases
In this article, we'll learn how to use PaddleDetection to train a YOLOX model from scratch, logging all of your metrics and model checkpoints with Weights & Biases.
Add a comment

Iterate on AI agents and models faster. Try Weights & Biases today.