Generating Digital Painting Lighting Effects via RGB-space Geometry
Exploring the paper "Generating Digital Painting Lighting Effects via RGB-space Geometry" in which the authors propose an image processing algorithm to generate digital painting lighting effects from a single image.
Created on May 16|Last edited on April 7
Comment
The Results
Run set
16
Introduction
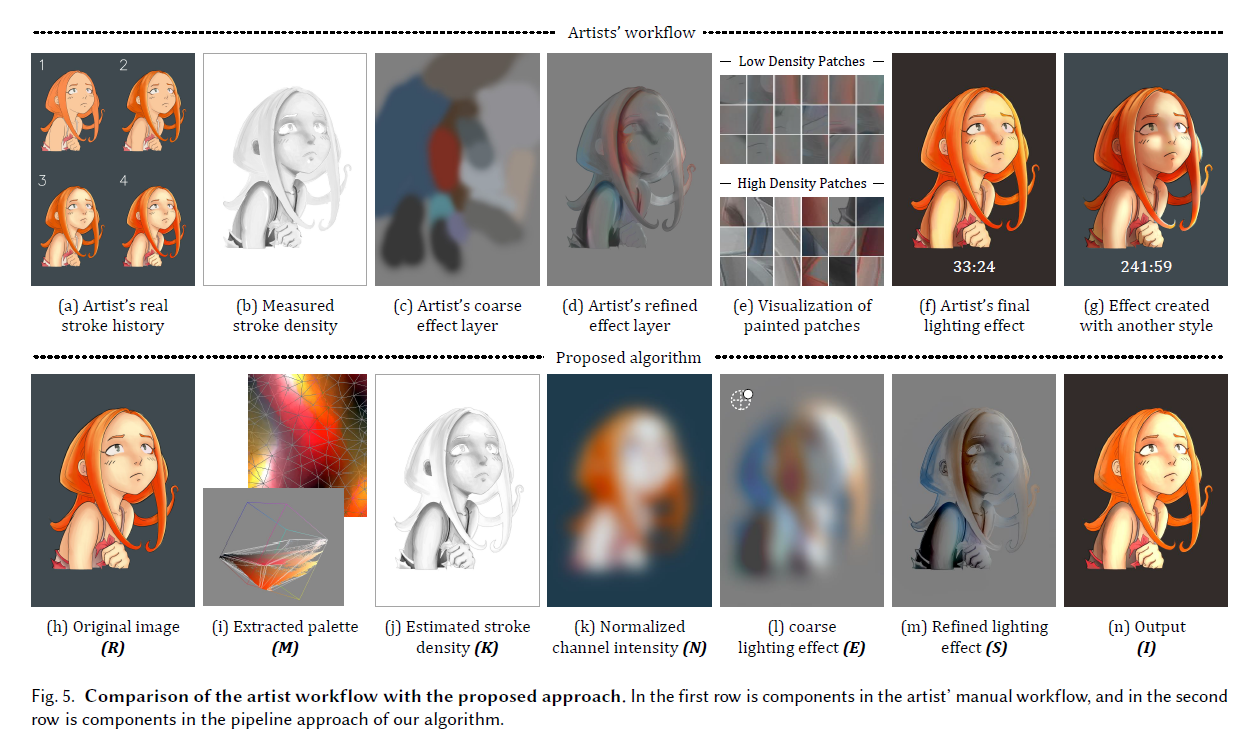
Lighting plays an important role in digital and matte painting. Unlike physical illumination in the real world or rendered scenes, the painted lighting effects in digital paintings are created by artists using heterogeneous strokes. In the paper titled "Generating Digital Painting Lighting Effects via RGB-space Geometry" the authors propose an image processing algorithm to generate digital painting lighting effects from a single image. The algorithm is based on the key observation that: artists use many overlapping strokes to paint lighting effects, i.e., pixels with dense stroke history tend to gather more illumination strokes. Based on this observation they devised an algorithm that can:
- Estimate the stroke density of the input image based on that image itself using color geometry.
- Generate visually realistic lighting effects by mimicking artists’ coarse-to-fine workflow.
The Paper →
Here's a video released by the authors of the paper that provides an overview of the proposed algorithm.
Overview of The Paper
The proposed algorithm is step by step mimicking of artists' lighting effect composition workflow. In current artistic workflows, artists manually paint these lighting effects and tediously modify them to find the best composition. In order to create usable lighting effect products, artists usually first draw some global or coarse illumination layers, and then retouch the details of these layers to naturally fit the original image content. The drawbacks of this process are:
- It's very time consuming.
- It's labor intensive.
The algorithm is based on this key assumption that artists’ newly painted strokes are related to their previous stroke history. But most of the digital paintings do not have this stroke history information available. Furthermore recording such an information is impractical due to its high resolution.
Proposed Method
- We directly estimate the density of stroke history. We do this by first extracting a virtual palette from the input image, and then make use of the relationship between pixel colors and palette colors to estimate the stroke density. And all this can be done with only one finished illustration/image.
- Then we apply the lightning effect by mimicking artists' workflow going from coarse to fine.
- First, we generate a coarse effect map. This map is a rough and low-frequency rendering of the highlights, shadows, and the color variations caused by the influence of nearby objects.
- This coarse effect map is then refined to fit the original image structure, thereby allowing the generation of aesthetically pleasing lighting results.
Key Features
The key features of this paper include:
- The algorithm requires only one image to do all of the above.
- The lighting effects can be applied to photographs, or 3D rendered images.
- Takes approximately 0.06 seconds to generate the effects.
- The algorithm supports multiple light sources.
- The algorithm can be applied on real life scenes/images, as well as digitally drawn illustrations.
The Code
Let's try to generate some interesting lightning effects ourselves.
The Code →
- Open up your anaconda command prompt and create a new conda environment.
conda create --name paintlightpip install https://github.com/ayulockin/PaintingLight
- Install the dependencies as shown in the repo's README. Make sure you have python 3.6.x version in the created environment. If you don't, do this:
conda install python=3.6.10
- Go to the directory with the code. Now you are ready to play with any example or can use your own image to see the effects.
cd codepython example001.jpeg
Note: In my fork of the original repo you need to signup to wandb.com so that you can visualize the results more interactively in the Weights & Biases dashboard.
Even if you are using the original repo you can follow the steps shown here and in the README. That will generate a cv2.window with the image. You can hover your mouse on the image to see the lightning effect. But to save these effects, you'll need to log the outputs into Weights & Biases.
The Results
Run set 2
2
Selected Results
Run set
15
Tweaking the Parameters
To try out the stunning lighting effects on your own image you can use –
python default.py path_to_image
You can also play around with the parameter values to produce the desired lightning effect. A list of all the parameters with their recommended values can be found in the README of the repo. I experimented with a few parameters by changing their ranges from a minimum to a maximum value while keeping the x and y values constant.
- light_source_height: This is the distance of the light source from the image. The recommended value is 1. To see the effect of this parameter I changed the value in the range (0.1, 2) with step size of 0.1. The result can be seen in the figure light_height_source_gif_015 below. Observe that the greater the height of the light source, the smaller the darker region.
- light_intensity: This is the intensity of the light. The recommended value is 0.85. To see the effect of this parameter I changed the value in the range (0, 1) with a step size of 0.1. The result can be seen in the figure light_intenity_gif_008 below.
- ambient_intensity: This is the intensity of the ambient light. The recommended value is 0.45. To see the effect of this parameter I changed the value in the range (0, 0.7) with a step size of 0.1. The result can be seen in the figure ambient_intensity_source_gif_018 below.
I encourage you to play with the values to generate visually appealing images.
The Code →
Run set
5
Conclusion and One Last Trick
Masking a region
The paper shows you how to mask your image to apply the lightning effect only at the desired regions. To do so, you can generate a binary mask and pass it to the algorithm. We've visualized the example provided by the authors in the figure below. Observe how there's only a horizontal effect applied on the giraffe.
Conclusion
This was an exciting project to work on. The project is still in a research phase and the authors are working on a Photoshop plug-in to enable widespread adoption. I hope you liked the visuals and it inspired you to give the repo a try yourself. It's super exiting that even in today's era of Deep Learning, classical image processing algorithms can at times generate really stunning results. For any feedback feel free to reach out to me on twitter @ayushthakur0.
Run set
1
Add a comment

Guillaume Rico •
Hi Ayush, I am a 51 year old motion graphic designer. I am fascinated by your papers. where do I start learning Python for that kind of stuff? do I need to learn pyhton extensively or do I have to learn how to use one or more specific librairies?
2 replies

Iterate on AI agents and models faster. Try Weights & Biases today.