Implementing CLIP With PyTorch Lightning
This article explores how to use PyTorch Lightning to implement the CLIP model for natural language-based image search to find images for a set of given prompts.
Created on July 28|Last edited on January 17
Comment
Run set
3
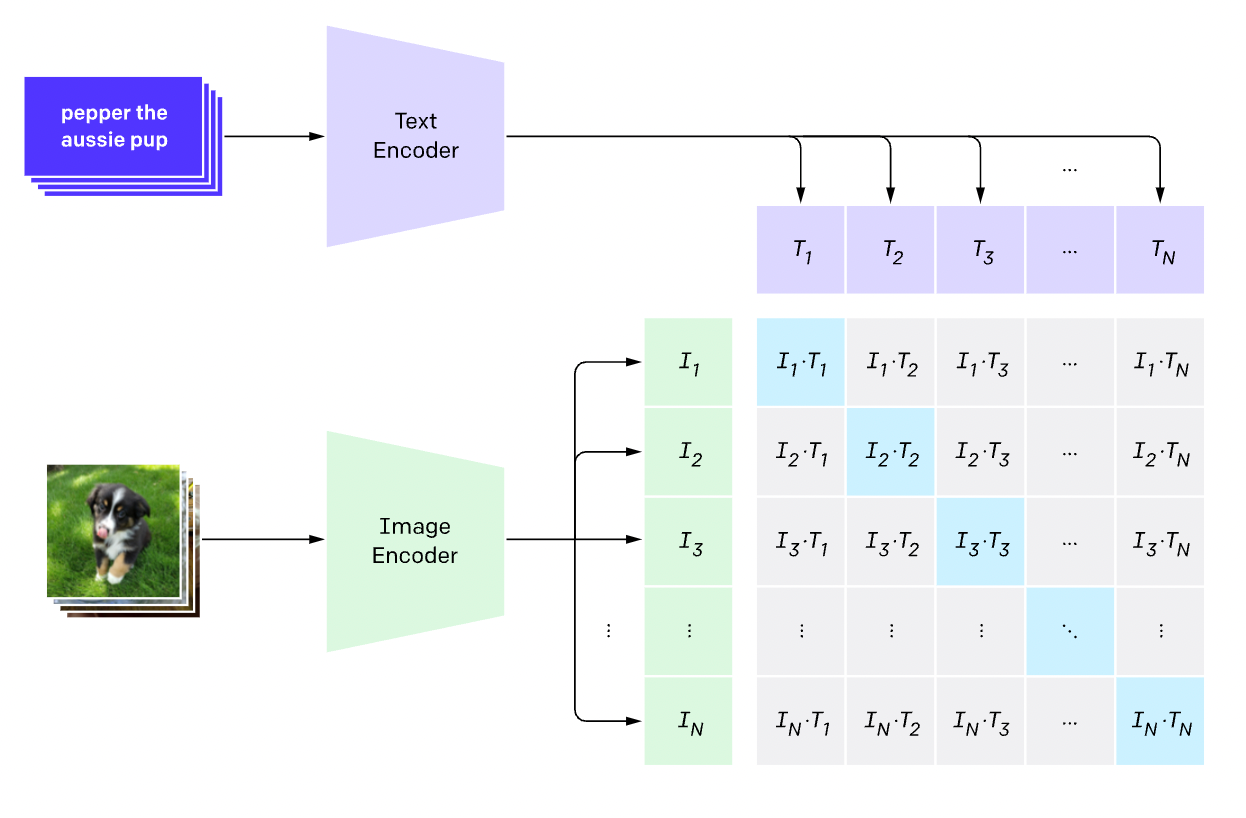
The CLIP model by OpenAI provides a really interesting way of linking images to the corresponding captions. How does it do that, you ask? The idea is actually rather simple! The most abundant source of image data with corresponding class labels is images with captions on the internet. CLIP finds a relationship between the image using an image encoder and the caption using a text encoder. This has opened it up for application in a lot of use cases like image classification, search, and ranking, and it was even used in the viral DALL-E 2 model for image generation!
In this article, we will look specifically at natural language-based image search. In other words, given a prompt, we will try to find the related images.
We'll also be using PyTorch Lightning. If you're new to PyTorch Lightning, think of it as a wrapper on PyTorch that allows users to abstract out a significant chunk of training logic while also providing ways to effectively keep all your code extremely modular.
In this article, we'll walk you through how you can use PyTorch Lightning to implement a complex model like CLIP. We'll use PyTorch Image Models for the image encoder and transformers for the text encoder. If you would like to dive straight into the code, our GitHub repository is available here. Moreover, our implementation can be adopted on a new dataset very easily (we'll talk about that in the next section). Currently, we provide support for Flickr8k, Flickr30k, and MS COCO Captions.
Table of Contents
Setting Up the Data PipelineImplementing the ModelTraining the ModelBonus: Using Custom Callbacks for ValidationConclusionRelated Reports
Let's get started:
The LightningCLI is an amazing but lesser known tool to easily add command line arguments to your training script which we are going to talk about in this report.
💡
Setting Up the Data Pipeline
Storing Your Dataset Using W&B Artifacts
CLIP models use a dataset consisting of image-caption pairs. Let's dive into how you can use W&B artifacts to store and version your dataset and then use it while creating a PyTorch Lightning DataModule.
Today, we'll be using the Flickr8k dataset (which you can download here). Once it's downloaded, your directory structure will look something like this:
Flickr8k/├─ Images/│ ├─ img1.jpg│ ├─ img2.jpg│ ├─ img3.jpg├─ captions.txt
To save the dataset as a W&B Artifact, you can use the following snippet:
import wandbwith wandb.init(project="clip-image-retrieval", job_type="upload"):artifact = wandb.Artifact("flickr-8k", type="dataset")artifact.add_dir("Flickr8k")wandb.log_artifact(artifact)
Creating Dataloaders
Now that our dataset is logged let's start building our PyTorch Dataset.
In this example, the ImageRetrievalDataset accepts the artifact_id as an argument which will be generated in the previous step. We already have an artifact with Flickr8k available here, and the id for that is wandb/clip.lightning-image_retrieval/flickr-8k:v0.
The next argument is the tokenizer which is an instance of a HuggingFace tokenizer depending on the kind of text encoder you're using. This is followed by the target_size, which is the size to which all images are resized, max_length, which is the maximum length of the caption; and finally, lazy_loading, which lets you load images in memory in case your dataset is small in size.
class ImageRetrievalDataset(Dataset):def __init__(self,artifact_id: str,tokenizer=None,target_size: Optional[int] = None,max_length: int = 200,lazy_loading: bool = False,) -> None:super().__init__()self.artifact_id = artifact_idself.target_size = target_sizeself.image_files, self.captions = self.fetch_dataset()self.lazy_loading = lazy_loadingself.images = self.image_filesassert tokenizer is not Noneself.tokenizer = tokenizerself.tokenized_captions = tokenizer(list(self.captions),padding=True,truncation=True,max_length=max_length,return_tensors='pt')self.transforms = A.Compose([A.Resize(target_size, target_size, always_apply=True),A.Normalize(max_pixel_value=255.0, always_apply=True),])@abstractmethoddef fetch_dataset(self):passdef __len__(self):return len(self.captions)def __getitem__(self, index):item = {key: values[index]for key, values in self.tokenized_captions.items()}image = cv2.imread(self.image_files[index])image = cv2.cvtColor(image, cv2.COLOR_BGR2RGB)image = self.transforms(image=image)["image"]item["image"] = torch.tensor(image).permute(2, 0, 1).float()item["caption"] = self.captions[index]return item
Another thing you may notice is that fetch_dataset is an abstract method. The reason behind that is for any new dataset, you can define your own fetch_dataset method which returns two lists: paths to image files and corresponding captions. Here's an example of how you can do that:
class Flickr8kDataset(ImageRetrievalDataset):def __init__(self,artifact_id: str,tokenizer=None,target_size: Optional[int] = None,max_length: int = 100,lazy_loading: bool = False,) -> None:super().__init__(artifact_id, tokenizer, target_size, max_length, lazy_loading)def fetch_dataset(self):if wandb.run is None:api = wandb.Api()artifact = api.artifact(self.artifact_id, type="dataset")else:artifact = wandb.use_artifact(self.artifact_id, type="dataset")artifact_dir = artifact.download()annotations = pd.read_csv(os.path.join(artifact_dir, "captions.txt"))image_files = [os.path.join(artifact_dir, "Images", image_file)for image_file in annotations["image"].to_list()]for image_file in image_files:assert os.path.isfile(image_file)captions = annotations["caption"].to_list()return image_files, captions
LightningDataModule
A data module is a shareable, reusable class that encapsulates all the steps needed to process data. As follows:
from typing import Optionalfrom torch.utils.data import random_split, DataLoaderfrom pytorch_lightning import LightningDataModulefrom transformers import AutoTokenizerfrom .base import ImageRetrievalDatasetfrom .flickr8k import Flickr8kDatasetfrom .flickr30k import Flickr30kDatasetDATASET_LOOKUP = {"flickr8k": Flickr8kDataset,"flickr30k": Flickr30kDataset}class ImageRetrievalDataModule(LightningDataModule):def __init__(self,artifact_id: str,dataset_name: str,val_split: float = 0.2,tokenizer_alias: Optional[str] = None,target_size: int = 224,max_length: int = 100,lazy_loading: bool = False,train_batch_size: int = 16,val_batch_size: int = 16,num_workers: int = 4,**kwargs):super().__init__(**kwargs)self.artifact_id = artifact_idself.dataset_name = dataset_nameself.val_split = val_splitself.tokenizer = AutoTokenizer.from_pretrained(tokenizer_alias)self.target_size = target_sizeself.max_length = max_lengthself.lazy_loading = lazy_loadingself.train_batch_size = train_batch_sizeself.val_batch_size = val_batch_sizeself.num_workers = num_workersdef prepare_data(self):pass@staticmethoddef split_data(dataset: ImageRetrievalDataset, val_split: float):train_length = int((1 - val_split) * len(dataset))val_length = len(dataset) - train_lengthtrain_dataset, val_dataset = random_split(dataset, lengths=[train_length, val_length])return train_dataset, val_datasetdef setup(self,stage: Optional[str] = None,) -> None:dataset = DATASET_LOOKUP[self.dataset_name](artifact_id=self.artifact_id,tokenizer=self.tokenizer,target_size=self.target_size,max_length=self.max_length,lazy_loading=self.lazy_loading,)self.train_dataset, self.val_dataset = self.split_data(dataset, val_split=self.val_split)def train_dataloader(self):return DataLoader(self.train_dataset,batch_size=self.train_batch_size,num_workers=self.num_workers,)def val_dataloader(self):return DataLoader(self.val_dataset,batch_size=self.val_batch_size,num_workers=self.num_workers,)
As the complexity of your processing grows (transforms, multiple-GPU training), you can let Lightning handle those details for you while making this dataset reusable so you can share it with colleagues or use it in different projects.
Implementing the Model
The CLIP model consists of three parts: the image encoder, the text encoder, and the projection head. We'll share the relevant code below.
Image Encoder
import timmimport torchfrom torch import nnclass ImageEncoder(nn.Module):def __init__(self, model_name: str, pretrained: bool = True, trainable: bool = True) -> None:super().__init__()self.model = timm.create_model(model_name, pretrained=pretrained, num_classes=0, global_pool="avg")for param in self.model.parameters():param.requires_grad = trainableself.target_token_idx = 0def forward(self, x):return self.model(x)
Text Encoder
import torchimport transformersfrom torch import nnclass TextEncoder(nn.Module):def __init__(self, model_name: str, trainable: bool = True) -> None:super().__init__()self.model = transformers.AutoModel.from_pretrained(model_name)for param in self.model.parameters():param.requires_grad = trainableself.target_token_idx = 0def forward(self, input_ids, attention_mask):output = self.model(input_ids=input_ids, attention_mask=attention_mask)last_hidden_state = output.last_hidden_statereturn last_hidden_state[:, self.target_token_idx, :]
Projection Head
The projection head is responsible for taking both the image and text encodings and embedding them into the same dimensional space.
import torchfrom torch import nnclass ProjectionHead(nn.Module):def __init__(self, embedding_dim: int, projection_dim: int, dropout: float) -> None:super().__init__()self.projection = nn.Linear(embedding_dim, projection_dim)self.gelu = nn.GELU()self.fc = nn.Linear(projection_dim, projection_dim)self.dropout = nn.Dropout(dropout)self.layer_norm = nn.LayerNorm(projection_dim)def forward(self, x):projected = self.projection(x)x = self.gelu(projected)x = self.fc(x)x = self.dropout(x)x += projectedreturn self.layer_norm(x)
LightningModule
The LightningModule brings the three parts of the model together and lets us quickly organize our training code without having to worry about any .cuda() calls or device management during multi-GPU training.
The __init__ function initializes all three parts of our model according to the provided hyperparameters. The self.save_hyperparameters() call saves the hyperparameters to your W&B dashboard.
class CLIPDualEncoderModel(LightningModule):def __init__(self,image_encoder_alias: str,text_encoder_alias: str,image_encoder_pretrained: bool = True,image_encoder_trainable: bool = True,text_encoder_trainable: bool = True,image_embedding_dims: int = 2048,text_embedding_dims: int = 768,projection_dims: int = 256,dropout: float = 0.0,temperature: float = 1.0,weight_decay: float = 0.0,head_lr: float = 1e-3,image_encoder_lr: float = 1e-4,text_encoder_lr: float = 1e-5,lr_scheduler_patience: float = 1.0,lr_scheduler_factor: float = 0.8,*args,**kwargs,) -> None:super().__init__(*args, **kwargs)self.image_encoder = ImageEncoder(model_name=image_encoder_alias,pretrained=image_encoder_pretrained,trainable=image_encoder_trainable,)self.text_encoder = TextEncoder(model_name=text_encoder_alias, trainable=text_encoder_trainable)self.image_projection = ProjectionHead(embedding_dim=image_embedding_dims,projection_dim=projection_dims,dropout=dropout,)self.text_projection = ProjectionHead(embedding_dim=text_embedding_dims,projection_dim=projection_dims,dropout=dropout,)self.log_softmax = nn.LogSoftmax(dim=-1)self.temperature = temperatureself.weight_decay = weight_decayself.head_lr = head_lrself.image_encoder_lr = image_encoder_lrself.text_encoder_lr = text_encoder_lrself.lr_scheduler_patience = lr_scheduler_patienceself.lr_scheduler_factor = lr_scheduler_factorself.save_hyperparameters()def _compute_losses(self, image_embeddings, text_embeddings):logits = (text_embeddings @ image_embeddings.T) / self.temperatureimages_similarity = image_embeddings @ image_embeddings.Ttexts_similarity = text_embeddings @ text_embeddings.Ttargets = F.softmax((images_similarity + texts_similarity) / 2 * self.temperature, dim=-1)images_loss = (-targets.T * self.log_softmax(logits.T)).sum(1)texts_loss = (-targets * self.log_softmax(logits)).sum(1)return (images_loss + texts_loss) / 2.0def forward(self, inputs):image_features = self.image_encoder(inputs["image"])text_features = self.text_encoder(input_ids=inputs["input_ids"], attention_mask=inputs["attention_mask"])image_embeddings = self.image_projection(image_features)text_embeddings = self.text_projection(text_features)return image_embeddings, text_embeddingsdef configure_optimizers(self):parameters = [{"params": self.image_encoder.parameters(), "lr": self.image_encoder_lr},{"params": self.text_encoder.parameters(), "lr": self.text_encoder_lr},{"params": itertools.chain(self.image_projection.parameters(),self.text_projection.parameters(),),"lr": self.head_lr,"weight_decay": self.weight_decay,},]optimizer = optim.Adam(parameters, weight_decay=self.weight_decay)lr_scheduler = optim.lr_scheduler.ReduceLROnPlateau(optimizer,mode="min",patience=self.lr_scheduler_patience,factor=self.lr_scheduler_factor,)return {"optimizer": optimizer,"lr_scheduler": lr_scheduler,"monitor": "val/loss",}def training_step(self, batch, *args, **kwargs):image_embeddings, text_embeddings = self.forward(batch)loss = self._compute_losses(image_embeddings, text_embeddings).mean()train_loss = self.all_gather(loss)self.log("train/loss", train_loss.mean())return lossdef validation_step(self, batch, *args, **kwargs):image_embeddings, text_embeddings = self.forward(batch)loss = self._compute_losses(image_embeddings, text_embeddings).mean()val_loss = self.all_gather(loss)self.log("val/loss", val_loss.mean())return loss
The configure_optimizers method sets up the model optimizer and, optionally, the learning rate scheduler and returns them in a dictionary.
The training_step and validation_step methods take a batch as input, process the batch, and return the loss. The PyTorch Lightning trainer automatically handles the gradient propagation and updates the model weights.
Training the Model
Now that we have the data pipeline and model all setup, training our model is the easy part.
Run set 2
3
We used the command line interface to train a few different models to compare how different image and text encoders perform:
Run set
5
Bonus: Using Custom Callbacks for Validation
To keep track of the model performance while training, we pick some prompts randomly from the validation set and see if the model can find the corresponding images. We then log the prompt with the corresponding images to W&B using Tables:
Run set
5
Code (click to expand)
Conclusion
In this article, we went through how you can use PyTorch Lightning to implement complex models like CLIP and how it helps keep the code extremely modular by dividing the model and data pipeline into separate modules. It automatically handles device management and propagates losses to update model weights. The implementation described above is available here with support for loading Flickr8k, Flickr30k, and MS-COCO Captions. You can pull pre-trained backbones from PyTorch Image Models and HuggingFace or train the backbones from scratch.
You can learn more about CLIP here:
Related Reports
How to Integrate PyTorch Lightning with Weights & Biases
A quick tutorial on integrating Lightning with W&B, complete with executable code and interactive visualizations
Image Classification Using PyTorch Lightning and Weights & Biases
This article provides a practical introduction on how to use PyTorch Lightning to improve the readability and reproducibility of your PyTorch code.
Add a comment
Tags: Articles, Computer Vision, CLIP, COCO, Experiment, Panels, Plots, Tables, Github, PyTorch Lightning

Iterate on AI agents and models faster. Try Weights & Biases today.