Using Google's Agent Development Kit and Agent2Agent
Discover the Agent2Agent (A2A) open protocol for AI interoperability. Learn A2A principles & build a multi-agent system using Google's ADK in our tutorial.
Created on April 10|Last edited on April 15
Comment
The landscape of AI agents is rapidly evolving. We're witnessing a surge in intelligent assistants capable of handling increasingly specialized tasks—whether it's managing calendars, summarizing complex research, or assisting with software development. These agents are no longer just novelty tools; they’re becoming integral to workflows across industries.
However, as these agents grow in capability and specialization, a new challenge emerges: interoperability. What happens when we need multiple agents—often developed by different companies, using different architectures, and operating within separate ecosystems—to collaborate on a more complex, multi-step task? The current infrastructure isn’t built for seamless coordination across these siloed systems, and this limitation is becoming more apparent as our reliance on agent-based automation deepens.
The Agent2Agent (A2A) protocol is being developed precisely to dismantle these barriers. Think of it as establishing a common language and a shared set of operational standards for AI agents, much like standardizing ports or network protocols. A2A aims to be an open specification providing this essential common ground, allowing agents to interact and collaborate smoothly, no matter who built them or where they operate. The potential benefits are compelling: enhanced productivity through streamlined delegation, lower development overhead thanks to standardization, and the fostering of a richer ecosystem where diverse agent skills can be easily combined. With significant backing from key technology partners, (and Weights & Biases is proud to be one of them) A2A represents a practical step towards a more integrated and powerful AI future. This guide aims to unpack the Agent2Agent protocol – what it is, its mechanics, and why it's gaining momentum.

Table of contents
What is the Agent2Agent protocol?Key design principles of the Agent2Agent protocolCore components of the Agent2Agent protocolFacilitating communication and task managementReal-world applications and future of Agent2AgentTutorial: Building a multi-agent system Setting up our toolkitWhat we'll buildDefine the toolsAdding real-world capabilities: Weather and news toolsImplementing safety: Input guardrails with before_model_callbackAdding alayer: Tool Usage guardrails with before_tool_callbackDefining the AgentsBridging worlds: Connecting our ADK agent via Agent2AgentA2A vs. MCP: A Quick DistinctionConclusion
What is the Agent2Agent protocol?
Fundamentally, Agent2Agent is being established as an open protocol specification. Instead of just a loose agreement, think of it as a defined set of technical standards – outlining specific communication schemas, API definitions, and standardized interaction patterns – meticulously designed for AI agent collaboration. Its core technical function is to enable disparate AI agents, regardless of their underlying architecture or who developed them, to programmatically discover each other, exchange structured data regarding tasks and capabilities, and reliably invoke functionalities across system boundaries.
Why is achieving this kind of technical interoperability between AI agents so crucial right now? Because without such a standard, the AI landscape remains fragmented. Powerful agents often operate within proprietary silos, making meaningful cross-agent cooperation inefficient and expensive, usually demanding custom API integrations for every new connection. The Agent2Agent protocol directly confronts this integration challenge.
Its primary objectives are framed around overcoming these technical hurdles:
- Enhance Workflow Productivity: By standardizing the methods for task delegation, context sharing, and information exchange between agents, allowing for more seamless automation.
- Reduce Integration Overhead: By providing a common communication backbone and interface definition, significantly lowering the engineering effort and costs associated with connecting diverse agent systems.
- Accelerate Compound Innovation: By making it technically simpler for developers to build novel applications that compose or chain the specialized capabilities of various agents through these standardized interfaces.
In essence, Agent2Agent aims to provide the essential technical "plumbing" required for building a more cooperative, powerful, and interconnected ecosystem of AI agents.
Key design principles of the Agent2Agent protocol
Developing a robust standard like the Agent2Agent protocol requires a clear philosophy. It’s not just about connecting agents; it’s about doing it effectively, securely, and flexibly. The A2A protocol is built upon five key design principles that shape its architecture and implementation:
- Embracing Agentic Capabilities: This isn't just about simple request-response interactions. The protocol is fundamentally designed acknowledging that AI agents possess agency – the ability to reason, plan, operate autonomously, and make decisions to achieve goals. A2A aims to support these sophisticated capabilities, allowing agents to engage in complex, multi-step collaborations, not just basic data exchange.
- Building on Existing Standards: Agent2Agent leverages established, widely adopted web and internet standards – such as HTTP, RESTful principles, and security patterns like OAuth – wherever possible. While specific standards referenced may evolve, the core principle is to build upon existing, proven technologies. This approach accelerates development, improves interoperability with existing infrastructure, and makes it easier for developers already familiar with these standards to adopt and implement the Agent2Agent protocol.
- Ensuring Security by Default: When you have autonomous agents potentially acting on behalf of users or systems, security cannot be an afterthought. Agent2Agent incorporates security considerations right into its core design. This means defining mechanisms for authentication, authorization, and secure data exchange from the outset, ensuring that agent interactions are trustworthy and protected against misuse.
- Supporting Long-Running Tasks: Real-world work often isn't instantaneous. An agent might be tasked with something complex that takes significant time – think planning an entire vacation, generating a detailed report, or processing a large dataset. The Agent2Agent protocol is explicitly designed to handle these asynchronous, long-running operations, managing the communication and state tracking required for tasks that might span minutes, hours, or even longer.
- Being Modality Agnostic: Collaboration shouldn't be restricted by the type of information being handled. Whether agents need to exchange text, images, structured data, voice commands, or other forms of information (modalities), the protocol aims to be flexible. Agent2Agent is designed to facilitate interactions involving diverse data types, ensuring it can support a wide range of applications and agent capabilities without being tied to a single mode of communication.
These five principles act as the guiding compass for Agent2Agent, ensuring the resulting protocol is powerful enough for sophisticated agentic interactions, practical by using existing tech, secure by design, capable of handling real-world task durations, and flexible enough for future needs.
Core components of the Agent2Agent protocol
For the Agent2Agent protocol to facilitate collaboration, it defines specific architectural components that handle different parts of the interaction. The key components are:
- Agent Card: This is essentially an agent's digital identity and capability statement. Imagine a standardized business card or a manifest file for an AI agent.The Agent Card contains crucial metadata, likely including:
- Identification: Who the agent is.
- Capabilities: What tasks the agent can perform or what services it offers.
- Endpoints: How other agents can communicate with it (e.g., API addresses).
- Requirements: Any necessary information for interaction, potentially including security protocols or data formats it expects. The primary function of the Agent Card is discovery – allowing potential clients (other agents or systems) to find agents and understand their basic offerings and how to connect.

- A2A Server: This component typically runs alongside the agent that is providing a service or capability (often referred to as the 'remote agent' in an interaction). Its main responsibilities are:
- Listening: It exposes an endpoint that listens for incoming requests formatted according to the Agent2Agent protocol specification.
- Processing: It receives valid Agent2Agent requests, interprets them, and interfaces with the actual underlying AI agent logic to execute the requested task.
- Managing: It handles the lifecycle of the task, which is particularly important for the long-running operations mentioned in the design principles.
- Responding: It sends back responses, status updates, or final results to the requesting client, again using the standardized Agent2Agent format. Essentially, the A2A Server acts as the host and execution handler for an agent's capabilities within the A2A framework.
- A2A Client: This is the component that initiates the interaction. It could be another AI agent, an application, or a user-facing interface that needs to leverage the capabilities of a remote agent. The Agent2Agent Client's role involves:
- Discovery (using Agent Cards): Finding the appropriate agent and understanding how to interact with it.
- Request Formulation: Constructing a request message that adheres to the Agent2Agent protocol's standards, specifying the desired task and providing necessary input data.
- Communication: Sending the request to the target agent's A2A Server endpoint.
- Response Handling: Receiving and processing the response (or updates) from the A2A Server. The A2A Client is the initiator and consumer of services within an agent2agent interaction.
These three components – the descriptive Agent Card, the servicing A2A Server, and the initiating A2A Client – form the fundamental triangle that enables structured, standardized communication and task management between different AI agents under the Agent2Agent protocol. You can view the complete JSON of the protocol structures on A2A's github repo.
Facilitating communication and task management
So, we have the Agent Card, the A2A Client, and the A2A Server. How do these pieces actually enable smooth communication and get tasks done between different AI agents using the Agent2Agent protocol? It boils down to a structured interaction flow:
- Task Initiation: It typically begins with the A2A Client. Let's say one agent (acting as the Client) needs another agent's (the remote agent's) specialized skill – perhaps summarizing a document or analyzing an image. Having discovered the remote agent and its capabilities (likely via its Agent Card), the Client constructs a task request. This isn't just a casual message; it's a carefully formatted request adhering to the A2A protocol's specifications. This standardized request clearly outlines the desired action and includes any necessary input data (like the document to be summarized).
- Transmission and Processing: The Client then sends this protocol-compliant request to the designated endpoint of the remote agent's A2A Server. When the Server receives the request, its first job is often to validate it – ensuring it follows the Agent2Agent rules. Once validated, the Server interprets the request and invokes the underlying logic of its associated AI agent, passing along the task details and input data. This kicks off the actual work.
- Managing the Interaction (Especially for Longer Tasks): Here's where the design principle for handling long-running tasks becomes crucial. If the requested task takes more than a few moments, the A2A Server might not just sit silently. The protocol allows for mechanisms where the Server can acknowledge receipt of the task immediately and then potentially provide periodic status updates back to the A2A Client ("Processing started," "50% complete," etc.). This prevents the Client from being stuck waiting in the dark and allows for more dynamic, real-time monitoring of progress.
- Completion and Response Delivery: Once the remote agent completes the assigned task, the A2A Server takes the result (or any errors encountered), packages it into a standardized response format defined by the Agent2Agent protocol, and sends it back to the originating A2A Client.
- Receiving and Utilizing Results: The A2A Client receives this structured response. Because it's formatted according to the Agent2Agent standard, the Client knows exactly how to parse it, extract the relevant information (the summary, the analysis results, etc.), and then use it for its own purposes, perhaps presenting it to a user or feeding it into the next step of a larger workflow.
This structured sequence – standardized initiation, server-side processing with potential status updates, and standardized response delivery – forms the core mechanism by which Agent2Agent facilitates reliable, dynamic communication and effective task management across diverse AI agents and platforms.
Real-world applications and future of Agent2Agent
The technical framework of Agent2Agent is designed for impact, but where might we actually see it simplifying complex tasks? Let's consider a scenario: integrated travel planning.
Imagine you're using your preferred calendar app or a dedicated planning assistant (acting as the A2A Client). You decide you want to plan a weekend trip. Instead of manually opening multiple websites or apps for flights, hotels, and activities, you simply state your destination and dates to your assistant. This client agent could then leverage A2A to:
- Send a standardized request to a specialized flight-search agent (running its own A2A Server), providing your criteria.
- Simultaneously or sequentially, query a hotel-booking agent (another A2A Server) for availability and pricing, perhaps even using potential flight times from the first agent as input.
- Reach out to a local events and recommendations agent (yet another A2A Server) to find concerts, tours, or restaurant suggestions matching your interests for those dates.
Each specialized agent processes the Agent2Agent request and returns the relevant information (flight options, hotel choices, event listings) in a standardized format defined by the protocol. Your primary assistant (the Client) then aggregates this structured data, potentially resolving dependencies (like confirming hotel availability only for viable flight times), and presents you with a cohesive itinerary proposal. This kind of seamless integration across different service providers, facilitated by the common Agent2Agent language, is precisely the type of efficiency gain A2A aims to deliver.
This travel planning scenario is just one possibility. The true ambition of Agent2Agent lies in fostering much broader agent interoperability. Think about scientific research where an agent managing experimental data could use A2A to trigger analysis agents, which then pass results to visualization agents, all without manual data wrangling between steps.
Consider creative workflows where an agent generating text could collaborate with an agent creating images and another composing background music. This potential for combining diverse, specialized AI skills is expected to be a significant catalyst for innovation, enabling developers to construct more sophisticated and powerful composite AI applications.
Looking ahead from our perspective, a vital element enabling this future is the protocol's open-source nature. By making the Agent2Agent specifications publicly accessible, it encourages widespread adoption and allows anyone to build agents that can 'speak' this common language. Furthermore, this fosters community contributions. As various developers and organizations engage with Agent2Agent, they can collectively refine the standard, develop best practices, create helpful tooling, and share insights, ultimately accelerating the development of a rich, interconnected AI ecosystem. The collaborative potential inherent in this open approach is key to unlocking the full promise of A2A.
While A2A, unveiled at Google Cloud Next 2025, provides the open standard 'language' for these agents to collaborate, actually building robust, production-ready agents and complex multi-agent systems requires dedicated, powerful tooling. Addressing this implementation challenge head-on, Google introduced the Agent Development Kit (ADK) at the same event. ADK is a comprehensive, open-source framework designed to simplify the entire end-to-end development lifecycle for sophisticated agentic applications. It's noteworthy that this is the same framework used to power agents within Google's own products, now made available to developers everywhere.
ADK is built around several core capabilities:
- Multi-Agent System Focus: Agent Development Kit is explicitly designed for building applications composed of multiple specialized agents, facilitating complex coordination and delegation between them.
- Flexibility in Models & Tools: It allows developers to choose their preferred LLMs (Gemini, models via Vertex AI Model Garden, or many others through LiteLLM integration) and equip agents with a wide array of tools – from pre-built functionalities like Search to third-party libraries (LangChain, LlamaIndex) and even using other agents as tools.
- Rich Interaction: Agent Development Kit supports advanced interaction models, including unique bidirectional audio and video streaming capabilities for more natural, human-like conversations.
- Full Lifecycle Support: Beyond just building, ADK provides flexible orchestration options, an integrated local development experience (CLI and Web UI), built-in evaluation frameworks for assessing agent performance, and streamlined paths for deployment (containerized or optimized for Google Cloud's Vertex AI).
Tutorial: Building a multi-agent system
Agent Development Kit provides a comprehensive toolkit to build, test, and run sophisticated agentic applications with more flexibility and control. To get a feel for how ADK simplifies this process, let's make these ideas concrete. We're going to build a simple yet illustrative multi-agent system ourselves, demonstrating how to incorporate memory, implement safety guardrails, and set up automatic delegation from a root agent – all using ADK.
Setting up our toolkit
Before we dive into the code, let's quickly go over the essential Python libraries we'll need for this tutorial and why:
- google-adk: This is the star of the show – Google's Agent Development Kit. It provides the core framework for defining our agents, their tools, managing interactions (facilitating the kind of agent collaboration we've discussed), and orchestrating the overall system.
- litellm: To showcase ADK's flexibility, we'll use litellm. This library acts as a bridge, allowing our ADK agents to potentially use a wide variety of Large Language Models, not just those from Google (think OpenAI, Anthropic, etc.).
- weave: As agent systems become more complex, understanding what's happening inside is crucial. We'll integrate W&B Weave to add observability, helping us track, visualize, and debug our agent's behavior and decision-making process.
- pyowm: Let's give our agent a practical skill! This library provides a convenient way to connect to the OpenWeatherMap API and fetch real-time weather data.
- newsapi-python: To add another dimension, we'll use this library to fetch current news headlines on specific topics via the NewsAPI.
This tutorial demonstrates the core Agent Development Kit mechanisms. We'll highlight the main code snippets and explain the key concepts. For complete, runnable code and more detailed exploration, I highly recommend checking out the associated GitHub repository. This example is adapted from a tutorial available in the official ADK documentation.
What we'll build
Our goal is to construct a multi-agent assistant team capable of performing several functions, showcasing key Agent Development Kit features:
- Managing conversational pleasantries via specialized greeting and farewell sub-agents.
- Fetching and reporting real-time weather conditions using the pyowm library and an external API.
- Retrieving the latest news headlines for a user-provided topic using newsapi-python.
- Implementing safety checks:
- An input guardrail to block requests containing a specific keyword.
- A tool-use guardrail preventing the weather tool from being used for a specific city (e.g., "Paris").
This hands-on example will illustrate how ADK helps orchestrate these different components – multiple agents, external tools, state management (implicitly through tool context/callbacks), and safety layers – into a cohesive system.
Let's import the required libraries
import osimport warningsimport loggingimport asynciofrom typing import Optional, Dict, Anyimport weave# External API Clientsimport pyowmfrom newsapi import NewsApiClient# ADK Componentsfrom google.adk.agents import Agentfrom google.adk.models.lite_llm import LiteLlm # For potential multi-model usefrom google.adk.sessions import InMemorySessionServicefrom google.adk.runners import Runnerfrom google.adk.tools.tool_context import ToolContextfrom google.adk.tools.base_tool import BaseToolfrom google.adk.agents.callback_context import CallbackContextfrom google.adk.models.llm_request import LlmRequestfrom google.adk.models.llm_response import LlmResponse# Google Generative AI typesfrom google.genai import types as google_typesfrom dotenv import load_dotenv# Load environment variablesload_dotenv()# --- Configuration ---warnings.filterwarnings("ignore")logging.basicConfig(level=logging.INFO)weave.init("Google-Agent2Agent")# --- Define Model Constants ---MODEL_GEMINI_2_0_FLASH = "gemini-2.0-flash"
Define the tools
With the setup handled, how do we give our agents specific skills beyond just generating text? This is where Tools come into play within Agent Development Kit. As highlighted in the documentation:
In ADK, Tools are the building blocks that give agents concrete capabilities beyond just text generation. They are typically regular Python functions that perform specific actions, like calling an API, querying a database, or performing calculations.
We'll be defining a few tools for our agent team. To ease into it and demonstrate the fundamental concept, let's start with two very basic tools - one for handling greetings and another for farewells. While you might integrate such simple interactions differently in a large-scale application, creating them as distinct tools is an excellent way to understand the core mechanics: define a Python function, write a clear docstring explaining its purpose and arguments (this is crucial for the LLM), and then attach it to an agent.
# Greeting and Farewell Tools@weave.op() # Add weave decoratordef say_hello(name: str = "there") -> str:"""Provides a simple greeting."""logging.info(f"Tool 'say_hello' executed with name: {name}")return f"Hello, {name}!"@weave.op() # Add weave decoratordef say_goodbye() -> str:"""Provides a simple farewell message."""logging.info("Tool 'say_goodbye' executed.")return "Goodbye! Have a great day."
Adding real-world capabilities: Weather and news tools
While simple greetings are useful for demonstrating the basics, the real power of agent systems often lies in their ability to interact with external data and services. Let's equip our agent team with two more practical tools:
- Real-Time Weather: We'll define a get_real_weather function. This tool will use the pyowm library to connect to the OpenWeatherMap API, fetching the current weather conditions for a city specified by the user. Importantly, this tool will also interact with the agent's memory (session state via ToolContext) to potentially use or remember user preferences, like their preferred temperature unit (Celsius or Fahrenheit).
- Latest News Headlines: Next, we'll add a get_latest_news function. This tool leverages the newsapi-python library to query the NewsAPI for recent headlines based on a topic the user provides.
Notice that when we define these functions, we'll add the @weave.op() decorator above them. This decorator signals to W&B Weave that these functions are distinct operations we want to track, which will be invaluable for observing and debugging our agent's behavior later.
@weave.op() # Add weave decoratordef get_real_weather(city: str, tool_context: ToolContext) -> dict:"""Retrieves the current real weather report for a specified city using OpenWeatherMap."""logging.info(f"Attempting to get real weather for city: '{city}'")owm_api_key = os.environ.get("OWM_API_KEY")try:# Initialize PyOWMowm = pyowm.OWM(owm_api_key)mgr = owm.weather_manager()# Get Weather Observationlogging.info(f"Querying OpenWeatherMap API for city: {city}")observation = mgr.weather_at_place(city)w = observation.weatherif w is None:# This case might be rare if NotFoundError is caught, but good to checklogging.error(f"OWM observation for '{city}' did not contain weather data.")raise ValueError(f"Weather data not available in OWM response for {city}")# Extract Temperature (Kelvin)temp_data = w.temperature("kelvin")if not temp_data or "temp" not in temp_data:logging.error(f"Could not find 'temp' in OWM temperature data: {temp_data}")raise ValueError("Temperature data missing 'temp' key in OWM response.")temp_k = temp_data["temp"] # Direct access after checklogging.debug(f"Temperature (Kelvin): {temp_k}")# Read unit preference from statepreferred_unit = tool_context.state.get("user_preference_temperature_unit", "Celsius")# Convert temperatureif preferred_unit == "Fahrenheit":temp_c = temp_k - 273.15temp_value = (temp_c * 9 / 5) + 32temp_unit = "°F"else: # Default to Celsiustemp_value = temp_k - 273.15temp_unit = "°C"logging.debug(f"Converted temperature: {temp_value:.1f}{temp_unit}")# Extract other detailsstatus = w.detailed_statushumidity = w.humiditywind_speed = w.wind().get("speed", "N/A")# Format Reportreport = (f"The current weather in {city.capitalize()} is '{status}' "f"with a temperature of {temp_value:.1f}{temp_unit}. "f"Humidity is {humidity}%, and wind speed is {wind_speed} m/s.")result = {"status": "success", "report": report}# Update last checked city in statetool_context.state["last_city_checked_stateful"] = city.capitalize()logging.info(f"Updated state 'last_city_checked_stateful': {city.capitalize()}")return result
We define the news tool as well
@weave.op()def get_latest_news(topic: str) -> dict:"""Fetches the latest 5-10 news headlines for a given topic using NewsAPI."""logging.info(f"Tool 'get_latest_news' called for topic: {topic}")news_api_key = os.environ.get("NEWS_API_KEY")try:newsapi = NewsApiClient(api_key=news_api_key)# Fetch news articles related to the topic, sorted by published date (latest first)# Using 'everything' endpoint for broader search on a topicarticles_data = newsapi.get_everything(q=topic, language="en", sort_by="publishedAt", page_size=10) # Get up to 10 articlesif articles_data["status"] != "ok":raise Exception(f"NewsAPI returned status: {articles_data.get('code', 'unknown')} - {articles_data.get('message', 'No message')}")articles = articles_data["articles"]if not articles:summary = f"I couldn't find any recent news articles about '{topic}'."logging.warning(f"No news articles found for topic: {topic}")return {"status": "success","news_summary": summary,} # Success, but no articles# Format the top 5-10 headlinesnum_headlines = min(len(articles), 10) # Show up to 10headlines_list = []for i, article in enumerate(articles[:num_headlines]):title = article.get("title", "No Title")source = article.get("source", {}).get("name", "Unknown Source")headlines_list.append(f"{i+1}. {title} ({source})")summary = (f"Here are the latest {num_headlines} headlines I found about '{topic}':\n"+ "\n".join(headlines_list))result = {"status": "success", "news_summary": summary}logging.info(f"Fetched {num_headlines} news headlines for topic: {topic}")return result
Implementing safety: Input guardrails with before_model_callback
Now that our agents have the potential to process user input and interact with external APIs based on that input, ensuring safety and control becomes paramount. We don't want our agents processing harmful requests or misusing their tools. Agent Development Kit provides mechanisms for this through Callbacks, which are essentially checkpoints you can insert into the agent's thinking and execution process.
What is before_model_callback?
Think of this callback as a vigilant gatekeeper positioned right before the agent sends its request to the core large language model. Remember, this request isn't just the user's latest message; it includes the agent's instructions, the conversation history, and potentially tool information. The before_model_callback gives you a critical opportunity to:
- Inspect: Examine the entire request package destined for the LLM.
- Modify: Carefully alter parts of the request if needed (e.g., adding context, filtering content).
- Block: Completely stop the request from reaching the LLM if it violates predefined rules, and instead return a specific response directly to the user.
Why is this so useful? It allows you to enforce policies before engaging the LLM, which can save costs, prevent the generation of unwanted content, and ensure the agent stays within its designated boundaries. Common uses include:
- Implementing keyword-based blocking for off-topic or policy-violating requests.
- Dynamically adding timely information (like today's date or info from session state) to the prompt context just before the LLM sees it.
How does it work in practice?
You define a standard Python function that receives details about the current execution context (CallbackContext – providing access to agent info, session state via callback_context.state) and the actual request payload intended for the LLM (LlmRequest). Inside your function, you implement your checking logic. Based on the outcome:
- If the request is acceptable, your function returns None. Agent Development Kit sees this and proceeds to call the LLM as normal.
- If the request needs to be blocked, your function constructs and returns an LlmResponse object. This object contains the message you want the user to receive instead. ADK intercepts this response and sends it back immediately, effectively canceling the LLM call for that turn.
Our plan for the input guardrail:
To illustrate this, we'll implement a specific guardrail by following these steps (the code details are in the full example):
- Define a Python function, let's call it block_keyword_guardrail, designed as a before_model_callback. Its simple job will be to check if the user's latest input contains the word "BLOCK" (ignoring case).
- Modify the definition of our main root agent to tell Agent Development Kit it should execute this block_keyword_guardrail function before any call to its primary LLM.
- Set up the ADK Runner to use this newly configured agent.
- Perform test interactions, sending some normal requests and one containing the "BLOCK" keyword, to verify that the guardrail correctly intercepts the problematic request while allowing others through.
Adding alayer: Tool Usage guardrails with before_tool_callback
Checking the initial user input with before_model_callback is a vital first step. But sometimes, the LLM might generate a perfectly reasonable-sounding request that still leads to an undesirable tool action. Maybe it tries to call a tool with invalid arguments, or perhaps we want to restrict the use of a tool based on specific parameters for policy reasons. This is precisely where the before_tool_callback provides another crucial layer of control.
What exactly is before_tool_callback?
Think of this callback as a specialist inspector for tool usage. It gets invoked after the LLM has analyzed the request and decided, "Okay, I need to use Tool X with arguments Y," but just before the actual Python function for Tool X (like our get_real_weather) gets executed. Its core purpose is to give you a final chance to validate, modify, or block the tool call based specifically on the tool being called and the arguments the LLM generated for it.
This enables several important capabilities:
- Argument validation & sanitization: Check if the arguments provided by the LLM make sense. Are they the right type? Within allowed ranges? Do they need cleaning up before being passed to the tool?
- Resource/policy enforcement: Prevent specific tool executions based on the arguments. For example, blocking API calls for certain parameters to manage costs, blocking access based on user permissions stored in state, or, as in our upcoming example, preventing queries for specific restricted entities (like a particular city).
- Dynamic argument modification: You could use information from the ToolContext (like session state) to adjust or add arguments just before the tool runs.
How does this one work technically?
You define a Python function that receives three key pieces of information: the tool object itself (so you know which tool is about to run), the args dictionary containing the arguments generated by the LLM, and the tool_context for accessing session state and other contextual details. Inside your callback function:
- If you want to allow the tool to run (potentially with modified arguments you've adjusted directly within the args dictionary), your function should return None. ADK will then proceed to execute the original tool function.
- If you want to block the tool call entirely and substitute a different result, your function should return a dictionary. ADK intercepts this dictionary and treats it as the actual result of the tool call for this turn, completely skipping the execution of the original tool function. This returned dictionary should ideally match the expected structure of the tool's output (e.g., providing a custom error message in the same format the tool would use).
Our plan for the Tool guardrail:
We'll leverage this before_tool_callback to implement our specific "No weather checks for Paris" rule:
- Define a Python function, block_paris_tool_guardrail, as our before_tool_callback. It will specifically check if the tool being called is our weather tool (get_real_weather) and if the city argument provided by the LLM is "Paris" (case-insensitive).
- If it detects this specific scenario, the callback will return a custom error dictionary, effectively blocking the actual call to the OpenWeatherMap API.
- Update the root agent definition one last time, configuring it to use both the before_model_callback (for input keyword blocking) and this new before_tool_callback (for blocking the Paris weather check).
- Set up the ADK Runner associated with this final, doubly-guarded agent configuration.
- Run test interactions, requesting weather for allowed cities and then specifically for "Paris", to demonstrate the tool guardrail preventing the restricted call while allowing others.
# Model Guardraildef block_keyword_guardrail(callback_context: CallbackContext, llm_request: LlmRequest) -> Optional[LlmResponse]:"""Inspects user input for 'BLOCK', blocks if found."""agent_name = callback_context.agent_namelogging.debug(f"Callback 'block_keyword_guardrail' running for agent: {agent_name}")last_user_message_text = ""if llm_request.contents:for content in reversed(llm_request.contents):if content.role == "user" and content.parts:if isinstance(content.parts[0], google_types.Part) and hasattr(content.parts[0], "text"):last_user_message_text = content.parts[0].text or ""breakkeyword_to_block = "BLOCK"if keyword_to_block in last_user_message_text.upper():logging.warning(f"Keyword '{keyword_to_block}' found. Blocking LLM call.")callback_context.state["guardrail_block_keyword_triggered"] = Truelogging.info("Set state 'guardrail_block_keyword_triggered': True")return LlmResponse(content=google_types.Content(role="model",parts=[google_types.Part(text="I cannot process this request (blocked keyword).")],))else:logging.debug(f"Keyword not found. Allowing LLM call for {agent_name}.")return None# Tool Guardraildef block_paris_tool_guardrail(tool: BaseTool, args: Dict[str, Any], tool_context: ToolContext) -> Optional[Dict]:"""Blocks 'get_real_weather' tool execution for 'Paris'."""tool_name = tool.nameagent_name = tool_context.agent_namelogging.debug(f"Callback 'block_paris_tool_guardrail' running for tool '{tool_name}' in agent '{agent_name}'")logging.debug(f"Inspecting tool args: {args}")# *** UPDATED target_tool_name ***target_tool_name = "get_real_weather"blocked_city = "paris"if tool_name == target_tool_name:city_argument = args.get("city", "")if city_argument and city_argument.lower() == blocked_city:logging.warning(f"Blocked city '{city_argument}' detected for tool '{tool_name}'. Blocking execution.")tool_context.state["guardrail_tool_block_triggered"] = Truelogging.info("Set state 'guardrail_tool_block_triggered': True")return { # Return error dictionary, skipping the actual tool"status": "error","error_message": f"Policy restriction: Weather checks for '{city_argument.capitalize()}' are disabled by a tool guardrail.",}else:logging.debug(f"City '{city_argument}' is allowed for tool '{tool_name}'.")else:logging.debug(f"Tool '{tool_name}' not targeted by Paris guardrail. Allowing.")logging.debug(f"Allowing tool '{tool_name}' to proceed.")return None # Allow tool execution
Defining the Agents
So, we have our toolbox ready – functions for greetings, farewells, fetching real-time weather, and getting news headlines. Now, we need the intelligence to wield these tools effectively. This is the role of the Agent in the Agent Development Kit.
Think of an Agent instance as the central coordinator for a specific capability or persona within your system. It's the component responsible for orchestrating the interaction flow: understanding the user's request, communicating with the underlying large language model for reasoning and text generation, and deciding precisely when and how to utilize the specific Tools it has been assigned.
When we create an Agent in ADK, we configure its core characteristics and abilities using several key parameters:
- name: A unique string that identifies this agent within your application (e.g., "greeting_agent", "news_fetcher"). This is helpful for organization, logging, and debugging.
- model: This parameter specifies the "brain" of the agent – the LLM that will power its reasoning and responses. Here you'll typically provide a model identifier string (like our constant MODEL_GEMINI_2_0_FLASH) or use the LiteLlm wrapper (if you want to leverage models from other providers like OpenAI or Anthropic.
- description: This is a concise, high-level summary of the agent's main purpose or capability. As we'll see when setting up our agent team, this description plays a crucial role in enabling delegation, as other agents use it to understand what this agent specializes in and when to pass tasks to it.
- instruction: Consider this the detailed operational manual for the agent's LLM. It's where you provide specific guidance on its persona, goals, conversational style, constraints, and – critically – clear instructions on when and how it should employ the Tools listed in its configuration. Effective prompting here is vital for reliable tool usage and overall agent behavior.
- tools: This is simply a Python list containing the actual tool functions (like say_hello, get_real_weather, get_latest_news) that this specific agent is authorized and equipped to use.
By carefully configuring these parameters for each agent, we can build a team of specialized collaborators. Let's define our agents now:
greeting_agent = Agent(model=MODEL_GEMINI_2_0_FLASH,name="greeting_agent",instruction="Greet the user friendly.",description="Handles simple greetings and hellos.",tools=[say_hello],)farewell_agent = Agent(model=MODEL_GEMINI_2_0_FLASH,name="farewell_agent",instruction="Provide a polite goodbye.",description="Handles simple farewells and goodbyes.",tools=[say_goodbye],)news_agent = Agent(model=MODEL_GEMINI_2_0_FLASH, # Can use a different model if desiredname="news_agent",instruction="You are a News Reporter agent. Your goal is to fetch and present the latest news headlines on a specific topic requested by the user. Use the 'get_latest_news' tool. Clearly state the topic and present the headlines returned by the tool. If the tool returns an error or no news, inform the user politely.",description="Fetches and presents the latest 5-10 news headlines for a given topic using the 'get_latest_news' tool.",tools=[get_latest_news],)root_agent = Agent(name="weather_news_assistant",model=MODEL_GEMINI_2_0_FLASH, # Orchestration modeldescription="Main assistant: Handles real weather requests, delegates news requests, greetings, and farewells. Includes safety guardrails.",instruction=("You are the main Assistant coordinating a team. Your primary responsibilities are providing real-time weather and delegating other tasks.\n""1. **Weather:** If the user asks for weather in a specific city, use the 'get_real_weather' tool yourself. The tool respects temperature unit preferences stored in state.\n""2. **News:** If the user asks for news on a specific topic (e.g., 'latest news on AI', 'updates on electric vehicles'), delegate the request to the 'news_agent'.\n""3. **Greetings:** If the user offers a simple greeting ('Hi', 'Hello'), delegate to the 'greeting_agent'.\n""4. **Farewells:** If the user says goodbye ('Bye', 'Thanks bye'), delegate to the 'farewell_agent'.\n""Analyze the user's query and delegate or handle it appropriately. If unsure, ask for clarification. Only use tools or delegate as described."),tools=[get_real_weather], # Root agent handles weather directlysub_agents=[greeting_agent, farewell_agent, news_agent],output_key="last_assistant_response",before_model_callback=block_keyword_guardrail,before_tool_callback=block_paris_tool_guardrail,)
Great now that our agent is complete we can interact with it via a number of options. Either via Dev UI, Terminal or API server.
We will run this with the web UI that ADK comes out of the box. Here's the command:
adk web
Here's what the web UI looks:

Notice how the agent delegates to the greeting agent in the first message and fetches the real time weather in the second message.
Also, we can see that the Agent refuses to tell the weather of Paris as we've asked it to do so in guardrails. This indicates that our guardrails are indeed in place and working perfectly.

We can even see how our different agents are connected, what's going in the input and output

Also notice how the agent fetches the real time news
Weave for monitoring the agents
One challenge with the multi-agent system we're constructing here is understanding how they make decisions and whether those decisions lead to optimal results. When an agent interacts with an LLM, chooses a tool, processes the tool's output, and perhaps loops back to the LLM or delegates to another agent, tracing that complex sequence of actions can be tricky.
This is precisely the problem that W&B Weave helps solve. As an observability platform, Weave is designed to capture, visualize, and let you analyze these intricate execution flows, logging the inputs, outputs, LLM calls, tool invocations, and data transformations along the way. It provides the transparency needed to effectively debug, evaluate performance, and truly understand what your agents are doing step-by-step.
Here are some screenshots of what we see on our Weave Traces dashboard after running our script (note how we used weave.op() in the above tools, we will see the results of it here):

We can see the exact prompt and the communication exchange between different agents in our Weave dashboard.

In the main table, we can also see how many tokens were utilized and the cost associated with them, which is pretty useful as the cost can blow up very quickly in these agentic-type workflows if we aren't careful.

💡
Bridging worlds: Connecting our ADK agent via Agent2Agent
In the tutorial portion of this post, we dove deep into the Agent Development Kit, using it to construct a multi-agent Weather Bot team – a capable system with specialized sub-agents, external tools, memory, and safety features. ADK excels at providing the framework to build this sophisticated internal logic.
But how does our ADK-built Weather Bot talk to the wider world of other agents? What if a travel planning agent (built by someone else using LangGraph, for example) needs the current weather in Rome from our bot, or if our bot needs to request a complex data analysis from an agent built with Crew.ai? How do these fundamentally different systems, potentially unaware of each other's internal workings, communicate effectively?
This is precisely the gap the Agent2Agent protocol is designed to fill. Think of Agent Development Kit as the toolkit for constructing your agent's 'brain' and 'body', while A2A provides the universal language and handshake mechanism allowing your agent to talk to other agents, no matter how they were built. It aims to be the open standard for agent interoperability.

Agent systems built using different frameworks (like ADK on the left, another framework on the right) can communicate with each other using the A2A protocol for inter-agent collaboration, while potentially using other protocols like MCP (Model Context Protocol) to interact with their specific tools and APIs.
A2A vs. MCP: A Quick Distinction
You might sometimes hear A2A mentioned alongside MCP (Model Context Protocol). It's helpful to know the difference:
- MCP generally focuses on connecting agents to tools, APIs, and resources in a structured way. ADK itself supports MCP, allowing agents built with it to leverage a wide range of tools.
- A2A specifically targets agent-to-agent collaboration. It enables dynamic, often multi-modal communication between different agent systems without them needing to share internal details like memory, resources, or specific tool implementations.
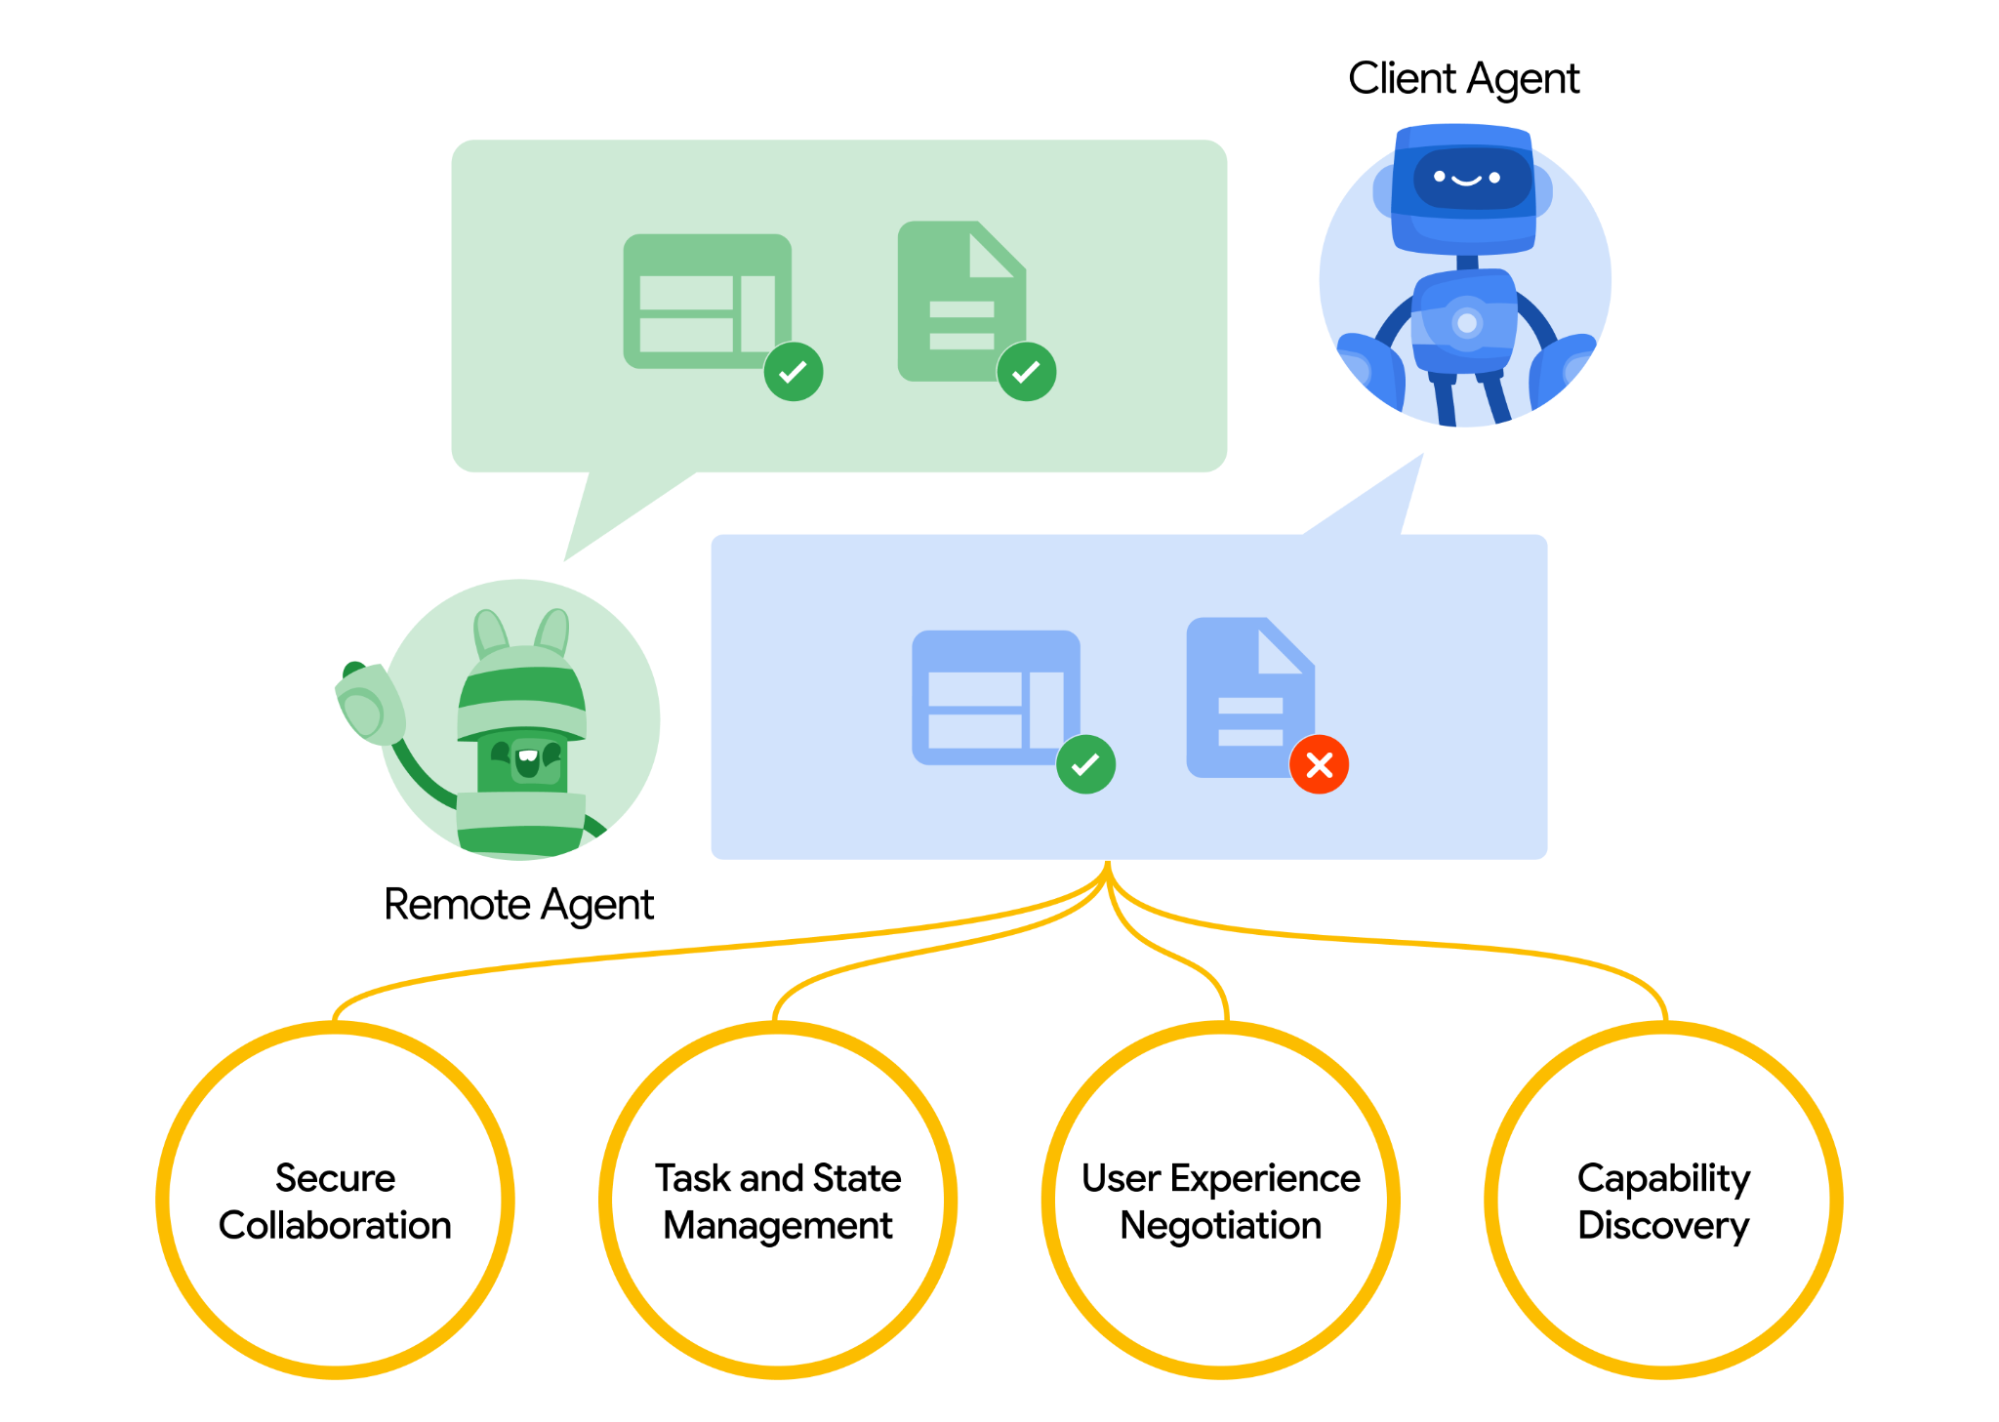
A2A Principles in Action with Our Weather Bot
- Opaque Execution: If our Weather Bot exposes its service via A2A, a calling agent only needs to know what skill to ask for (e.g., get_weather) and the expected input/output format via the Agent Card. It doesn't need to know we used ADK, PyOWM, or have internal sub-agents. A2A hides the internal complexity.
- Async First: Our get_latest_news tool might take time. A2A's asynchronous design (polling, SSE, Push Notifications) means our Weather Bot could handle longer operations without blocking the caller, providing status updates (TaskStatusUpdateEvent) if needed via streaming.
- Modality Agnostic: While we used text, A2A's Part object allows defining support for other data types (application/json, image/png, etc.) via the Agent Card, enabling richer interactions.
- Enterprise Ready & Simple: Using HTTP/JSON-RPC and standard authentication practices (like passing tokens in headers, declared via the Agent Card) makes A2A suitable for business use while leveraging familiar tech.
Exposing Our Weather Bot's Skills via A2A (The Agent Card)
To let other agents know what our Weather Bot can do, we'd publish an Agent Card. Based on our tutorial, this JSON description might include:
- Basic info: name: "ADK Weather & News Bot", description, url (the A2A endpoint).
- Authentication: Specifying the required scheme (e.g., schemes: ["OAuth2"]).
- Capabilities: Like streaming: true if it supports SSE for news updates.
- Skills: An array describing what it can do:
- Skill 1: id: "get_weather", name: "Get Current Weather", description: "Retrieves real-time weather for a city.", tags: ["weather", "real-time"], examples: ["weather in london"], inputModes: ["text/plain"], outputModes: ["text/plain"]
- Skill 2: id: "get_news", name: "Get Latest News", description: "Fetches recent news headlines for a topic.", tags: ["news", "headlines"], examples: ["news about AI"], inputModes: ["text/plain"], outputModes: ["text/plain"]
An external agent discovering this card would know exactly which skills are available and how to invoke them.
The A2A Conversation Flow for a Weather Request
Let's trace how an external agent (the A2A Client) would get weather from our ADK Weather Bot (acting as the A2A Server) using the protocol:
- Request (tasks/send): The Client constructs a JSON-RPC request targeting our A2A server's URL (via HTTP POST). The method is "tasks/send". The params include a unique task id and a message object (role: "user") containing parts (e.g., a TextPart with the query).
- Processing: Our A2A server wrapper receives this, validates the request/auth, extracts details.
- Internal ADK Execution: The wrapper triggers our internal ADK Weather Bot logic (passing the query). The ADK agent runs its flow (state, guardrails, tools).
- Response (Task Object): The ADK agent returns the result. Our A2A wrapper formats this into an A2A Task object (with the original id, sessionId, status: "completed", and an artifacts array containing the weather report in an Artifact with a TextPart). This Task object is sent back as the JSON-RPC result.
This structured exchange uses core A2A objects (Task, Message, Artifact, Part). A2A also defines methods for tasks/get, tasks/cancel, handling input-required states for multi-turn dialogues, and tasks/sendSubscribe for streaming via SSE.
Connecting To and From Our ADK Agent
The key takeaway is A2A's two-way, framework-agnostic capability:
- Our Bot as Server: Wrapped with an A2A server layer, our ADK Weather Bot can serve requests from any A2A-compliant client, whether built with LangGraph, Crew.AI, Microsoft Autogen, etc.
- Our Bot as Client: Our ADK agent could call other agents via A2A. If asked for flight prices, it could act as an A2A Client, discover a flight agent's Agent Card, send an A2A tasks/send request, and process the A2A Task response. This demonstrates direct collaboration between our ADK agent and agents built using different technologies.
Explore Official A2A Samples
A2A is designed as an open standard, and its development is ongoing, driven by community feedback. To see concrete code examples demonstrating A2A interactions, often integrating with frameworks like ADK, LangGraph, or Crew.AI, and to understand the full specifications, the definitive resource is the official A2A GitHub repository and its documentation.
Conclusion
So, we've seen that the world of AI is increasingly about getting different intelligent agents to work together effectively. This brings up two key challenges: how do we actually build capable agents, and how do we get them to talk to each other, especially if they're built using different tools or platforms? In this post, we tackled both. We explored Google's Agent Development Kit (ADK) as a powerful open-source framework for building multi-agent systems, walking through creating our Weather Bot team with practical features like delegation, session state for memory, and safety guardrails using callbacks. We also dove into how the Agent2Agent protocol aims to provide that crucial common language, enabling agents built with ADK, LangGraph, Crew.AI, or any other compliant framework to interoperate. And tools like W&B Weave are essential for keeping track of everything happening within these complex interactions. Hopefully, understanding how ADK helps build agents and how A2A helps them connect gives you a solid foundation to start creating your own collaborative AI applications.
Add a comment

Iterate on AI agents and models faster. Try Weights & Biases today.